Skip to content
:: Ahmad Bakdash ::

:: Ahmad Bakdash ::

Nooo , don't be earnest

Category: Open Source

استعادة الملفات المحذوفه عبر استخدام photorec في لينكس

Posted on August 28, 2018January 14, 2022 By ubuntu No Comments on استعادة الملفات المحذوفه عبر استخدام photorec في لينكس
استعادة الملفات المحذوفه عبر استخدام photorec في لينكس
 

 photorec برمجية مفتوحة المصدر  ومجانيه تعمل على مختلف انظمة التشغيل المعروفة :

  • DOS/Windows 9x
  • /Windows NT 4/2000/XP/2003/Vista/2008/7/8
  • Linux
  • FreeBSD, NetBSD, OpenBSD
  • Sun Solaris
  • Mac OS X

تقوم باستعادة الملفات المحذوفة من اقراص التخزين المتنوعه (اقراص صلبة , فلاش , ذواكر…).
فيما يلي شرح بسيط لاستخدامها خلال توزيعة ابونتو لينكس .
1- التنصيب:
تاتي photorec ضمن حزمة testdisk  لتنصيبها من محرر الاوامر التالي:

sudo apt-get install testdisk

بعد التنصيب كل ما عليك هو تشغيل photorec من خلال الامر التالي:
sudo photorec


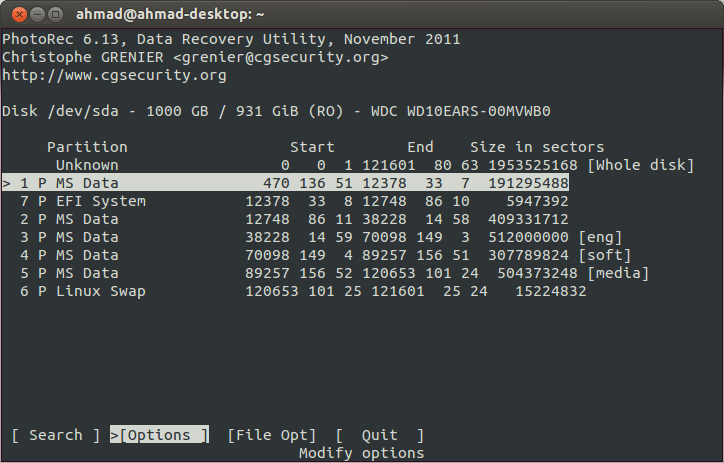
الان في حال لدينا اكثر من قرص صلب او ذاكرة او اي وسيط اخر نقوم بتحديده  , في مثالي لدي قرص صلب 1000 جيغا مقسم لعدة اقسام بانظمة ملفات مختلفة يمكنني ان اختار الاسترجاع من  جزء محدد او كامل القرص الصلب .
ahmad@ahmad-desktop: ~_016

بعد التحديد يوجد خيار File Opt يسمح لك ان رغبت بتحديد انواع الملفات (الامتداد) التي ترغب البحث عنها  سوف اتجاوزه حاليا .
باختيار search ستظهر شاشة لتحديد  القسم الذي ارغب ان استعيد الملفات اليه ونظام ملفاته  .
كوني اخترت افتراضيا الاستعادة على احد اقسام القرص ذاته ستظهر لي شاشة تطلب مني تحديد الجزء من القرص بالضغط C .
سيبدا البرنامج بالبحث وسيبدا بتخزين الملفات ضمن مجلدات recup_dir X في المكان الذي حددته .
هذا بايجاز كل شيء.
ahmad@ahmad-desktop: ~_017

ملاحظة :
لحذف الملفات المستعادة ومجلداتها يجب ان تكون روت او يمكنك ببساطة عبر التعليمة التالية :

sudo nautilus


How to Recover Deleted Files in Ubuntu through TestDisk

Share this:

  • Click to share on X (Opens in new window) X
  • Click to share on Facebook (Opens in new window) Facebook
  • Click to share on WhatsApp (Opens in new window) WhatsApp
  • Click to share on Telegram (Opens in new window) Telegram

Like this:

Like Loading...
Open Source, OS, Tools, Ubuntu

How to install VPNGate on Ubuntu17.10 (update 18.04)

Posted on March 14, 2018 By ubuntu No Comments on How to install VPNGate on Ubuntu17.10 (update 18.04)
How to install VPNGate on Ubuntu17.10 (update 18.04)

VPNGate  is an online service as an academic research at Graduate School of University of Tsukuba, Japan.As Academic Experiment Project ,The purpose of this research is to expand the knowledge of “Global Distributed Public VPN Relay Servers”.

The  project  offers free VPN servers that are ran by volunteers who use SoftEther[note]SoftEther VPN Project develops and distributes SoftEther VPN,
An Open-Source Free ​Cross-platform Multi-protocol VPN Program,
as an academic project from University of Tsukuba[/note]. It was designed with the Great Firewall of China in Mind and is sponsored by the University of Tsukuba,
Japan.

It‘s important to note that free VPNs are insecure, and they shouldn’t be used for sensitive or high important stuff!

VPNGate and softether  are open source and work on windows, linux, macos ,and android.

in this post i explain the way to install and setting  VPNGate on Ubuntu 17.10  (worked  fine on Raspbian (using  raspberry pi 3)).

1-  on terminal

sudo apt install python-requests openvpn resolvconf python-urwid wmctrl realpath gir1.2-appindicator3-0.1 gir1.2-notify-0.7 python-gobject git

note for ubuntu 18.04 use this command :

sudo apt install python-requests openvpn resolvconf python-urwid wmctrl  manpages-pl manpages-fr-extra gir1.2-appindicator3-0.1 gir1.2-notify-0.7 python-gobject git

Read More “How to install VPNGate on Ubuntu17.10 (update 18.04)” »

Share this:

  • Click to share on X (Opens in new window) X
  • Click to share on Facebook (Opens in new window) Facebook
  • Click to share on WhatsApp (Opens in new window) WhatsApp
  • Click to share on Telegram (Opens in new window) Telegram

Like this:

Like Loading...
Network, Open Source, Ubuntu

How to add text-to-speech to GoldenDict?

Posted on March 13, 2018January 14, 2022 By ubuntu 1 Comment on How to add text-to-speech to GoldenDict?
How to add text-to-speech to GoldenDict?
You can use the Programs tab to plug a text to speech software (espeak for example) into the golden dic.

Here are the steps:

  1. Install espeak:
    sudo apt-get install espeak

Open GoldenDict and hit F3 to bring up the Dictionaries window (or select Edit/Dictionaries menu).On the Sources tab, select Programs tab

Click the Add button, select Audio for the Type column, enter espeak for the Name, and espeak -v en %GDWORD% for the Command Line column.

  1. Don’t forget to check the Enabled box.
  2. Click OK

    Close the GoldenDict window and reopen it.for English American you can use this command
    espeak -v en-us %GDWORD%

Now you have an item named espeak in your dictionaries and your translation results. Clicking the speaker icon in front of the word in espeak result, reads the word for you.

Share this:

  • Click to share on X (Opens in new window) X
  • Click to share on Facebook (Opens in new window) Facebook
  • Click to share on WhatsApp (Opens in new window) WhatsApp
  • Click to share on Telegram (Opens in new window) Telegram

Like this:

Like Loading...
Open Source, Ubuntu

Posts pagination

Previous 1 2

Subscribe to Blog via Email

Enter your email address to subscribe to this blog and receive notifications of new posts by email.

Join 1 other subscriber

Recent Posts

  • How to Install VPNGate on Ubuntu 21.10, Kali linux, and windows 10
  • How to install Ubuntu Server 21.10 step by step.
  • How to Install Docker On Ubuntu 20.04 LTS.
  • Install Ubuntu GRUB boot repair
  • Using Diskpart to repartition a USB stick on windows Os

Recent Comments

  • Don on Install Ubuntu GRUB boot repair
  • Md Zayed on How to add text-to-speech to GoldenDict?

Woo

dictionary Docker dual boo freevpn kali nginx photorec raspberry softether ubuntu server ubuntu tips usb VPNGate windows wordpress error

Meta

  • Log in
  • Entries feed
  • Comments feed
  • WordPress.org

Copyright © 2025 :: Ahmad Bakdash ::.

Powered by PressBook Blog WordPress theme


Loading Comments...
 

    %d